(4) Creating and Managing Fields
Note: These instructions are for club administrators who have staff access to their club's management resources
Overview
The fields are used to collect information on a Service's registration form. Below are a few FAQ's about fields along with a step-by-step guide on how to create them for your convenience.
FAQ'S
What is a field?
A field is a text area or check box used to collect information on a Service's registration form. Fields can be configured in a variety of ways, and each field type looks different on the registration form.
How many fields should I create?
The club management software automatically collects basic account holder information for you (such as name, address, phone number, and email address) as well as basic information about the participant (such as name, gender, birthdate, and affiliation). Collection of participant information is optional and can be controlled through the service editor.
Fields are used to collect any additional information you need about the participant or account holder, so the number will vary between services. Some organizations will have 20 fields on the registration form and will collect everything from emergency contact information to meal preferences. Other services will require only one or two fields. For example, a registration form for regatta volunteers may only need to collect the time of day that they are able to volunteer.
What are Participant and Item fields?
Participant fields are linked to a participant and will pre-populate each time the participant registers for a service. Item fields must be filled in each time the participant registers. Item fields can be used for information that must be updated each time a person registers. For example, waivers are typically set up as item fields so that the registrant will be forced to accept the terms and conditions each time they register.
How to create a Field:
- Login using the 'Login' at the top of the RegattaCentral homepage.
- If you do not have an account or can not access yours follow the instructions in 'getting started'

- If you do not have an account or can not access yours follow the instructions in 'getting started'
- Your club management page will then open.
- Click 'Configuration'
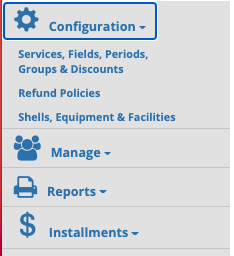
- Click 'Services, Fields, Periods, Groups & Discounts
- Click on 'Fields'
- Click 'New Field'
- This will open the field editor
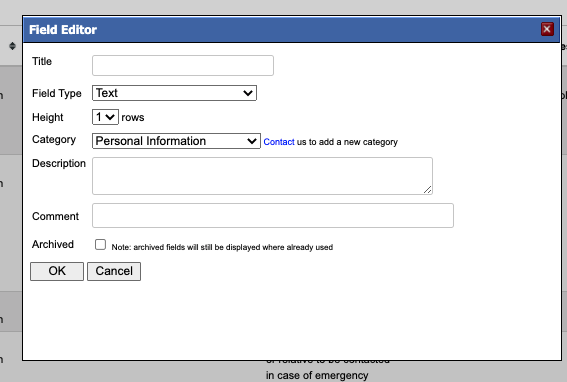
- Enter a Title
- Note: The Title will appear on the registration form
- Click the drop down menu to select a field type
Field Types
Description Checkbox
Options presented in a list format. User makes one or more selections using the checkbox to the left of each option
Date User will select a day, month, and year for their answer Dropdown Options presented in a dropdown menu. User is limited to one selection.
Radio Button
Options presented in list format. User makes one selection using the radio button to left of each option Text User types information into a text box Waiver/Terms & Conditions User is presented with attestation text and a checkbox. Waiver text will appear when user hovers over attestation text
- Text fields will allow the user to type information into a text box
- Example: The Title would read "Rowing Experience" and the Description would read "Where did you learn to row?" so that the user knows what to enter into the text box
- Waiver/Terms & Conditions fields allow the user to acknowledge that they have viewed and/or accept your text
- Selecting this field type will make the 'Agreement Text' and 'Attestation Text' boxes appear. Enter your waiver or other text into the 'Agreement Text' box and edit the 'Attestation Text' if necessary
- Checkbox, Dropdown, or Radio Button fields force the user to select an option from a list
- NOTE: Checkboxes allow the user to select more than one option. Dropdown and Radio Button limit the user to one choice.
- Selecting one of these three types will make an Options section appear.
- Enter each option using the 'Add' button.
- Use the 'Max' dropdown menu to limit the number of times each option can be selected (if necessary)
- Use the Remove, Sort, Up, Down buttons to manage the options
- URL, Telephone Number, Email Address will force the user to enter the information in the correct format
- Example: email address must be entered as 'support@regattacentral.com'. If there is no '@' sign making it valid, field will not be considered complete.
- Click on the drop down menu next to height to select the number of rows a field will occupy.
- Select the Category that best describes the new field.
- (optional) Enter a Description. This text will appear when the user hovers over the field on the entry form
- (optional) Enter a Comment if desired. Comments are visible only to staff and administrators
- (optional) The 'Archived' option can be used later if you need to retire the field from use
- Click 'OK' when you have entered all of the required information
- This will add your field to the list in the Fields tab. Next you will go to the Services tab to assign fields to services
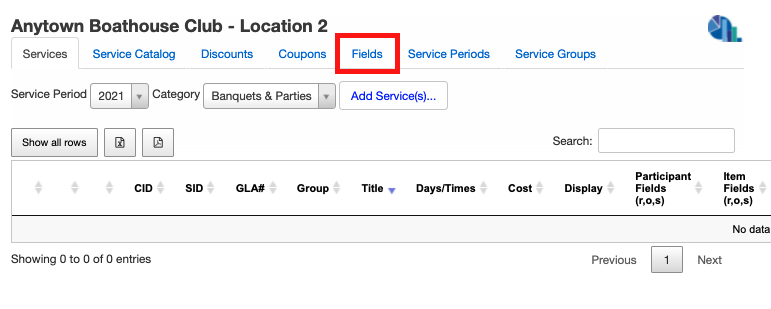

How to add a field to a service:
- Follow steps 1-4 above.
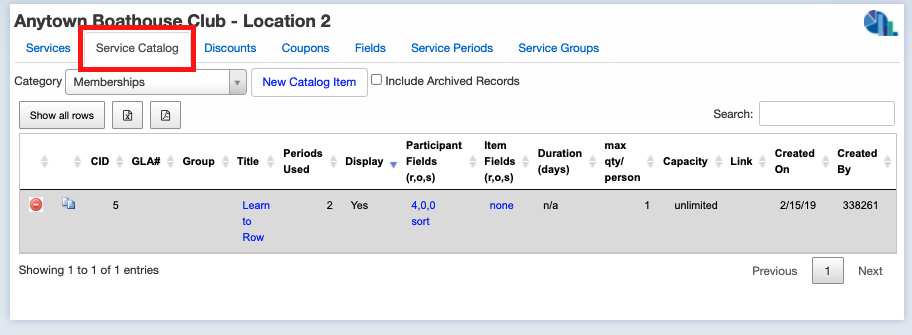
- Click the 'service catalog' tab
- Select the category from the drop down menu
- Find the service you wish to add a field to, under participant or item field select the number listed in blue or the word none in blue.
- NOTE: Participant fields are linked to a participant and will pre-populate each time the participant registers for a service. Item fields must be filled in each time the participant registers. Item fields can be used for information that must be updated each time a person registers. For example, waivers are typically set up as item fields so that the registrant will be forced to accept the terms and conditions each time they register.
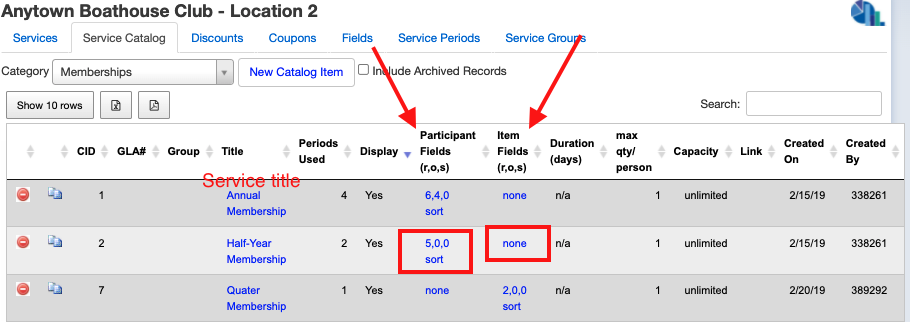
- Click the blue square to the left of each field to select it, and select required, optional or staff use for each item.
- Required: the registrant will be forced to complete the field
- Optional: the field will appear on the registration form but the user will not be forced to complete it
- Staff Use: the field will appear only in Staff reports (e.g. a checkbox to indicate that medical forms have been received by mail)
- Click the 'OK' button to add the fields to the service
- Click the 'sort' link to drag-and-drop fields into the correct order. Click the 'Close' button in this editor to save your changes

Support
For assistance, please contact your RegattaCentral Account Manager. If you need help finding their information, please contact support@regattacentral.com with "Please forward to Account Manager" in subject line or call 614-360-2922.